Contents
A Cat6 patch cable—or Cat6 patch cord—is an upgrade from a Cat5e patch cable and a crucial part of up-to-date networking. It connects devices to a local area network (LAN) at higher speeds and with superior bandwidth capacity compared to older Ethernet standards. Understanding what Cat6 patch cables are will help you plan solid networks in both domestic and business scenarios. In this guide, we’ll look into the specifications, benefits, and most common uses of Cat6 patch cables.
What is a Cat6 Patch Cable?
A Cat6 patch cable is a category of network patch cable planned for Ethernet-based networks. It complies with the TIA/EIA-568-C.2 standard and supports frequencies up to 250 MHz. This permits data transmission at a speed of up to 1 Gbps for lengths up to 100 meters, and even faster ones over shorter distances. Cat6 patch cable has four twisted pairs of copper wire—meant to lessen crosstalk, decrease electromagnetic interference, and prevent signal degradation.
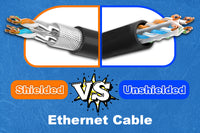
Cat6 can be unshielded and shielded, and the shielded type comes with tighter twisted pairs and stronger insulation than previous generations, like Cat5e. This additional protection significantly increases reliability, mainly in high-interference or high-bandwidth environments.
Note:
Although the terms Cat6 patch cables and Cat6 Ethernet cables are frequently used interchangeably, they are different things. The confusion comes from the fact that patch cables can be used as Ethernet cables as well.
Patch cables refer to Ethernet cables terminated with connectors, which are typically used in short-distance connections, like linking a computer to a router.
Ethernet cables are usually longer and used for linking devices that are far apart, such as a computer to a router in different rooms.
Standard vs. Slim Cat6 Patch Cables

Some individual customers may prefer slim Cat6 patch cables on the market. These patch cables have a smaller outer jacket, which are often built with 28 AWG copper wires. People use them to save space and improve airflow in tight networking racks or cabinets.
However, it’s important to see what differentiates them from standard Cat6 patch cables (commonly 24 AWG) when it comes to durability, resistance to interference, and general performance.
Slim Cat6 patch cables are generally the best option for short-distance connections (for instance, within a rack or across a patch panel) where saving space is critical. Some common cases of use include:
- Domestic Networks: Patching gaming consoles, smart TVs, or computers to a router, especially if cables are visible and you want to cut clutter.
- Small Offices: Linking workstations, switches, and patch panels in environments with limited space.
For professional and high-performance networking environments —such as corporate offices, data centers handling large volumes of data, or any place where consistent and reliable connectivity is required—standard Cat6 patch cables bring noticeable advantages:
-
Greater Sturdiness
Their thicker jackets and insulation make them more resistant to physical strain and environmental factors. -
Lower Attenuation & Heat Buildup
The larger gauge of standard Cat6 patch cables reduces signal loss over distance and disperses heat more effectively under higher PoE loads. -
Dependable Interference Resistance
While both cable types can be unshielded or shielded, standard Cat6’s thicker wire pairs often offer a stronger margin against crosstalk and EMI over longer distances. -
Easy to Upgrade or Expand
Standard Cat6 cables have the capacity to withstand upgrades or expansions, making them a more versatile long-term investment.
Expert Tip: If you opt for slim Cat6 cables in a high-density environment, choose only trusted manufacturers that certify TIA compliance and consider using shielded versions if you are worried about feasible EMI (electromagnet interference. Always keep your cables away from power lines or other sources of interference when possible.
Step-by-Step Tutorial: Installing a Cat6 Patch Cable
If you want to DIY your own Cat6 patch cable, follow our guide for easy operation.
Step 1: Preparation
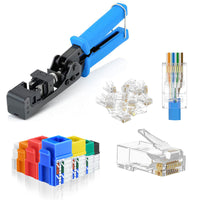
Grab All Your Materials and Tools
- Bulk Cat6 cable
- RJ45 connectors
- A wire stripper and cutter
- A crimping tool
- A cable tester
- (Optional but recommended) Labeling tags and cable management tools (such as Velcro ties or cable trays)
Step 2: Terminating a Cat6 Cable
Proceed with the following steps:
1. Cut and Strip the Cable
- Measure and cut the length of the Cat6 cable you need.
- Strip the Jacket. Use your wire stripper to remove about 1 inch of the outer jacket from one end. This exposes the twisted pairs inside. (Do it gently to avoid nicking the wires!)
2. Untwist and Organize the Wires
- Inside the cable, you’ll find four twisted pairs (usually color-coded as green, blue, orange, and brown). Softly untwist them just enough to be able to work with them—they’re twisted to reduce interference, so don’t overdo it.
- Arrange the Wires. Lay the wires out in the correct order according to the wiring standard you’re following (either T568A or T568B). If you’re not sure, have a wiring diagram handy.
3. Trim the Wires
- Trim the ends of the wires so they’re all even. This helps them slide neatly into the RJ45 connector.
4. Insert the Wires into the Connector
- Carefully slide the trimmed, aligned wires into an RJ45 connector, making sure each wire lines up with its proper pin.
5. Crimp the Connector
- Use your RJ45 crimping tool to firmly press down on the connector. This action secures the wires in place and ensures the connector’s strain relief is engaged properly.
6. Test the Terminated Cable
- Use your cable tester to check that every connection is solid and there are no shorts or mis-wirings. Testing now can save you a lot of troubleshooting later.
Learn more about creating your own Cat6 patch panel in the following video.
Conclusion
A reliable, high-speed network highly depends on the quality and correct usage of each Cat6 patch cable. Regardless of whether you are wiring a small domestic network, upgrading a business network, or running an entire data center, Cat6 gives you the speed and steadiness users demand. If you always follow demonstrated best practices—like using proper cable management, following endorsed bend radii, testing connections, and future-proofing for higher speeds—you’ll extend the life of your cable infrastructure and lessen downtime.
For more information on this topic, you can keep up on our blogs. While VCELINK offers general and basic information for our customers and other visitors to the website, it’s not professional advice.


Be the first one to comment.
Leave a comment