Contents
Wireless devices are making our lives easier; they are all over, from cell phones, and tablets to earbuds. While Wi-Fi has its advantages, it tends to fail in velocity and reliability, particularly in large homes (or even offices) with multiple devices. This is where a wired home network becomes your best aid. Keep reading and see why and how to install Ethernet in your home.
Why Choose a Wired Home Network?
- Speed and stability: Wired connections provide faster data transfer and lower latency (which is the time it takes data to travel from one point to another). This means evener streaming, quicker downloads, and a better responsive online experience.
- Security: Ethernet connections are intrinsically more secure than Wi-Fi. They are much less prone to unauthorized access and interference.
- Future-proofing: Thousands of new applications keep appearing each day. And they increasing the demand for high bandwidth. With a wired network, your home will be prepared to cope with the technological advancements.
Expert Tip: For home gadgets such as security cameras and smart TVs, a wired connection enables these devices to function flawlessly without the usual interruptions of wireless connections.
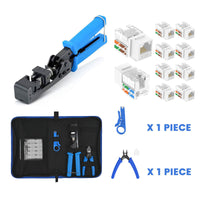
What You’ll Need: Tools and Materials
Control your enthusiasm and before anything else, gather the tools and materials you’ll need. You won’t want to interrupt the process to rush to the nearest store and get the things you need to complete your task. Make a list, get all the stuff you need and you’re ready to go.
Here’s a list of what you’ll need:
- Ethernet cables: To install Ethernet cables in-house, you’ll have to choose which cables match your needs. Choose Cat5e for basic needs, Cat6 for speeds up to 10Gbps, or Cat6a for up to 10 Gbps over longer distances. In addition, you need to consider which type of Ethernet cables you need.
- 8P8C modular plugs (RJ45)and keystone jacks: These are connectors that you’ll attach to the ends of your Ethernet cables. Opt for those high-quality RJ45 connectors and keystone jacks with gold-plated contacts for reliable data transmission.
- Cable tester: You can use the tester to verify if all your cables are functioning correctly.
- Ethernet switch/Router: What they do is distribute the network connection to multiple devices.
- Drill and fish tape: You’ll need these to run the cables through walls and tight spaces.
- Wall Plate: Wall plates are often installed in the room by mounting the Ethernet cables from other rooms.
- Patch Panel: If you need to run many Ethernet cables for different rooms, a patch panel is a good idea for efficient cable management.
- Crimping tool and other tools: You’ll need them to securely attach the modular plugs to the cables.

Expert Tip: Don’t hesitate to some extra money on quality tools and materials. This will save you time and headaches from eventual issues that might arise over time. For instance, with a reliable crimping tool, you’ll secure your connections and, consequently, lower the risk of connectivity problems.
Step-by-Step Guide to Installing Ethernet in Your Home
1. Plan Your Network Layout
First, decide in which rooms and devices you’ll be using the wired connection. Simply create a floor plan of your home, a hand-made sketch will suffice, although it’s better to use network design software or apps for more accurate planning. Mark where each device will be placed, and determine where the cables will run. Think of any future needs; it’s easier to install some extra cables now than having to add them later.
Expert Tip: Put your router or network switch in a central location to minimize cable lengths and ensure even distribution of the network signal.
2. Choose the Right Ethernet Cables
Certainly, if you are wiring your house for Ethernet, you’ll have to choose the proper ones. Selecting the appropriate cable type is crucial for optimum performance. The following are the most used ones when people decide to install Ethernet in their homes. When selecting your cables, you’ll need to evaluate your needs both in speed and coverage.
- Cat5e: Supports up to 1 Gbps speeds; good enough for basic home networks.
- Cat6: Offers up to 10 Gbps speeds over short distances and reduces crosstalk (the interference that can happen when the signal traveling through one wire may affect the signal of another close one).
- Cat6a: Provides enhanced shielding, ideal for high-performance networks and longer runs.
Expert Tip: For areas with potential electrical interference, such as gadgets or appliances that are nearby, opt for Cat6a cables with better shielding. Use shielded network cables in environments prone to electrical interference, plenum cables for HVAC ducts, and CMR-rated cables for general home usage.
3. Install Ethernet Cables
You already have your plan and the materials, then it’s time to proceed with the installation, let’s get into running Ethernet cables through the house!
- Drill access points: Make small holes in walls, floors, or ceilings where cables you’ll pass the cables.
- Run the cables: The fish tape will help you to guide cables through walls and tight spaces.
- Secure the cables: Keep the cables organized with clips or conduits. This will also prevent damage.
Expert Tip: Avoid sharp bends or twists in the cables, as they can worsen performance and cut the lifecycle of the network.
4. Terminate the Cables
Cable termination is very important for a reliable connection. Therefore, make sure to properly attach the modular plugs. Here’s how
- Strip the cable: Remove the external jacket very carefully to expose the inner wires.
- Arrange the wires: Align them according to the T568A or T568B wiring standard.
- Attach the plug: Insert the wires into the plug and use the crimping tool to properly secure them.
5. Test Your Connections
Testing your connections is of vital importance. It ensures your wired network connection works properly and also eliminates any potential connectivity problems that may arise.
To check your setup, you just need to follow the following simple steps:
- Use a cable tester: Plug each Ethernet cable into the tester. The tester will confirm if the connections are correctly terminated and detect any faults such as breaks or crossed wires.
- Check connectivity: Connect a device to each Ethernet port and verify if it connects to the internet or to your local network. If it doesn’t, check the cable terminations again.
- Monitor the network speed: There are many online speed test tools that can measure the performance of your network at each point. Check the results and see if they match the expected speeds for the type of cable you have. An important difference may suggest there’s a faulty cable or some interference.
- Look at the signal quality: For a strong network, it’s important that the signal doesn’t drop or get unstable during extended use. To check the stability of the signal run applications such as streaming video, or try transferring heavy files.
- Compatibility test: Test with different devices to verify compatibility and detect issues with a specific device.
- Signal consistency throughout the house: Try to connect to different rooms of the house to verify if the signal is consistent in them.
Expert Tip: Try to make it a habit to retest your network connections periodically, particularly after adding new devices or modifying your setup.
Simple Tips for Long-Term Performance
Congrats, now you finally have completed your wired home network installation. But of course, you’ll want it to work efficiently and prevent having issues. These easy tips will help you keep it in the best condition:
- Keep an eye on your cables: Check your cables frequently for any signs of damage.
- Surge protection: Use surge protectors to safeguard your equipment from energy fluctuations.
- Firmware updates: Update the routers and switch firmware regularly so you’ll always have the latest safety patches and overall enhancements.
Expert Tip: Conduct routine speed tests to verify if your network is operating at its best capacity. Unexpected slowdowns may be due to problems that need to be taken care of.
Conclusion
You may initially think that setting up a wired home network may seem daunting. Nevertheless, if you follow detailed planning and use the right, it can be a pleasant project or challenge anyone can. The effort will be worth it and rewarding, as you’ll enjoy the advantages of a wired home network setup: increased speed, stability, and security.
You're on the path to enjoying a continuous and reliable internet experience throughout your home.
For more information on this topic, you can keep up on our blogs. While VCELINK offers general and basic information for our customers and other visitors to the website, it’s not professional advice.


Be the first one to comment.
Leave a comment