Contents
The outdoor security camera installation might seem too challenging, even intimidating. But with the right guidance, it becomes easy even for a newbie. As a homeowner or business owner seeking to safeguard your property, a properly installed wired security system brings immense peace of mind.
In this guide, we’ll go through all the aspects you need to know to install your cameras on your own, from planning your setup to managing cables and weatherproofing connections with products like waterproof RJ45 couplers.
Wireless or Wired Outdoor Security Cameras?
So you are determined to install outdoor security cameras. The first decision you must make is deciding between wired and wireless cameras. For that, you have to consider how each of them matches your needs and your home’s. Let’s take a look at the pros and cons of each.
Wired Cameras:
Pros:
- Stable connections: Wired setups eliminate the signal loss or interference that you will often face with wireless cameras.
- Continuous power supply: With a wired setup, you won’t need to worry about your batteries getting drained and suddenly losing the protection your outdoor cameras provide.
- Crisp video quality: Wired connections can support higher bandwidth, which results in delivering sharper, more detailed footage.
- Visible deterrence: Visible cameras can prevent crime. A study conducted by the University of North Carolina shows that 60% of surveyed burglars would feel dissuaded by an alarm system and target another property instead.
Cons:
- More complexity: Installing them is a bit more complex as you’ll need to run cables to reach each location. This will require drilling and routing wires all around your property.
- Less flexibility: You’ll have fewer options for where to place your cameras, as this will be limited to where it’s feasible to route the cables.
Wireless Cameras
Pros:
- Simple setup: Wireless cameras connect to your Wi-Fi, making installation simpler and usually faster.
- Flexibility: You can mount your outdoor cameras almost anywhere you’d like to, without worrying about running cables.
Cons:
- Worrying about power supply: Depending on the camera you choose, powered by solar panels or batteries, you’ll have to recharge or change the batteries regularly.
- Interference issues: If your Wi-Fi signal is weak or the network is congested, you’ll eventually experience lower video quality and even failed connections.
Our Recommendation: If you are looking for reliable, consistent outdoor security, a wired setup is typically the best way to go. You can depend on it, you’ll get clear, high-quality video footage, and you won’t need to worry about batteries getting drained.
Outdoor Security Cameras Installation Planning
To prevent future headaches, don’t neglect to take the required time to make a thorough installation plan. So before grabbing the drill, spend some time creating a good plan. Here’s what you need to assess:
1. Identify crucial zones:
Take a walk around your property with eyes wide open. Put yourself in the eyes of eventual burglars and ask yourself what they might look at. Look for critical areas such as entrances, driveways, gates, garages, and side yards. Similarly, look at the walls, gates, or fences that shelter your property. After that, determine vantage spots where to place your cams so they cover broad angles.
2. Plan cable runs:
If you plan to use a wired system. Now comes cabling time. Make a map of the most convenient and discreet routes for your cables. Think of the shortest paths to avoid unnecessary cable length and also keep a neat look.
3. Check power access:
Think of easily accessible outlets or alternative routes for energy power, like running the cables through a wall, or garage.
4. Guard your Ethernet cables and connectors against external threats:
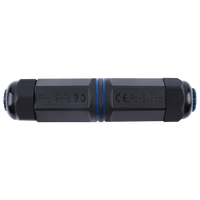
We strongly suggest using weatherproof junction boxes and waterproof RJ45 couplers. These will keep your cables and connectors safe from the harm that rain, snow, dust, or other external elements may cause.
5. Position your cameras:
Finding strategic spots to position your cameras is essential to ensure the most coverage. Select places where they can capture the most activity with minimal to no visual obstructions (for example plants, or tree branches). Position your cameras at least 8–10 feet off the ground to deter tampering.
Expert Tip: If you can’t drill your walls, a great solution is to use mounting through soffits or adhesive mounting solutions to lessen damage to your property.
Indispensable Tools and Equipment
Before starting with your outdoor security cameras, the are some “must-haves”; the tools and equipment you’ll need for a wired outdoor camera installation. The best practice is gathering them all in advance so that once you start on it, you won’t need to stop the process and rush to the closest store. So, make sure you write down a list of what you’ll need before heading to the store or ordering online. This is what you’d have handy:
- Ethernet cables (Cat5e or Cat6): Pick cables with weather-resistant jackets for outdoor use. If you plan to run cables through construction cavities, especially through long distances, use plenum-rated wires.
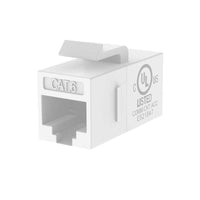
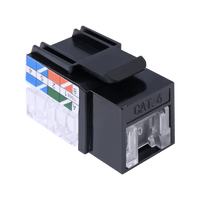
- Waterproof RJ45 couplers: These couplers are the ideal complement for connecting or extending Ethernet cables securely and prevent internal wiring from being exposed to moisture.
- Mounting hardware: Go for rust-resistant brackets and screws, specifically intended for exterior usage.
- Weatherproof power protection: Weatherproof enclosures or junction boxes, hide the unused ethernet ports and cable connections inside them.
- Cable clips and conduit: These will help you secure and protect the cables along walls.
- Cable tester: To confirm that each wire is correctly aligned and secure, use a cable tester and prevent connectivity issues and grant stable camera functioning.
- Sealing materials: Waterproof plugs for securing cable entry points.

Expert Tip: If your cameras support Power over Internet (PoE) injectors or switches, these can make your wiring much easier. Please, note that this will suit you if you have multiple security cameras and require long-distance coverage.
Step-by-Step Installation Guide
Now that you have your cameras and the additional necessary equipment, you’re set to go. It’s important to follow an order, and here are the numbered steps to ensure you succeed in your project.
- Mark the mounting locations: As in the planning stage you identified the best location for your outdoor security cameras, now it’s time to mark them. It would be good to test the reach angles with a temporary setup before starting to drill.
- Install junction boxes: Mount round or square weatherproof junction boxes to house cable connections and ethernet connectors.
- Run your cables: With utmost care, run the Ethernet cables from inside your home (typically where the DVR/NVR or router are placed). Fish tape will help you guide the cables through the walls. Inside, connect the cable to a PoE switch or a power source and a recording device.
- Use waterproof RJ45 couplers: In case you need to extend your cables outdoors or connect two segments of cables, use a waterproof RJ45. These couplers have resistant shells and sealing gaskets that will protect your connectors from corrosion. Just insert the cables through the coupler and secure they fit snuggly.
- Mount the camera and brackets: Securely attach the camera bracket to the junction box or mounting surface. Connect the camera’s pigtail (if it applies) to the Ethernet cable inside the box. Seal unused ports with rubber plugs or silicone caulk to prevent moisture. Now you’re ready to mount the camera on the bracket and adjust the angle.
- Power Your System and Connect It: For PoE cameras, connect the Ethernet cable directly to a PoE switch or NVR. For non-PoE setups, use weatherproof power adapters or enclosures near outdoor power outlets.
If the outlet is crowded or your adapter doesn’t fit, consider weatherproof power strip boxes to organize and protect multiple connections. - Test and Adjust the Camera Feed: Before finalizing, power on the system and check the live camera feed using the NVR or the camera app. Adjust the angles and confirm night vision, motion detection, and image quality.
Expert Tip: Always test Ethernet cables with a cable tester before sealing them in walls or junction boxes.
Weatherproofing and Maintenance
Outdoor conditions may be harsh, so ensuring durability is crucial for outdoor setups:
- Seal entry points: Use rubber grommets and silicone caulk to secure holes where cables enter junction boxes or walls.
- Cable management: Route wires neatly using protective covers or conduits.
- Inspection: Check all connections and cables periodically, especially after extreme weather.
- Cleanse the lenses periodically: Prevent pollen, dust, or raindrops from blurring the images.
- Update your cameras’ firmware: An updated firmware will let you improve the features, safety, and performance.
- Check the system: Every now and then review the recorded footage to verify the angle, exposure, and image resolution still meet the intended standards.
Expert Tip: Some homeowners decide to integrate their outdoor wired security cameras with different smart home platforms. If this is your case, verify the compatibility and secure your network settings to prevent unauthorized access.
Common Mistakes to Avoid
- Ignoring weatherproofing: Leaving connectors exposed can lead to failures.
- Messy wiring: Disorganized cables are vulnerable to damage.
- Improper camera placement: Mount cameras too low, and they become easy targets for tampering.
- Skipping tests: Testing your system thoroughly before finalizing prevents future troubleshooting.
Conclusion
Installing outdoor security cameras might seem complex, but with this guide, you can achieve a reliable, professional-grade setup. From careful planning and weatherproofing to effective power and cable management, every step ensures your system is ready to defend your property.
Start planning today, and enjoy the peace of mind that comes with a secure home or business.
For more information on this topic, you can keep up on our blogs. While VCELINK offers general and basic information for our customers and other visitors to the website, it’s not professional advice.


Be the first one to comment.
Leave a comment