Contents
If your Internet connection runs slowly or drops quickly, there is a chance that your cables may be damaged. For example, your Ethernet cables can be chewed through by rodents or damaged by incorrect bending. Aside from replacing the broken cable with a new one, are there any other effective methods to repair the Ethernet cable? You’re here in the right place.
Reasons for Ethernet Cable Damage
Ethernet cables are not fragile, but they can also be broken by incorrect use and other exterior factors. An Ethernet cable can be damaged by excessive bending and twisting, chemical exposure, extreme temperatures, incorrect installation, or it can be chewed by rodents. To prevent cable damage, you need to handle the cable carefully and provide proper cable management. But if your cable is visibly damaged, there are some ways to repair it.
3 Best Ways to Repair Ethernet Cables
Replace the Broken Ethernet cable
If you are a professional in network installation with expertise in cabling, replacing the broken Ethernet cable may be a simple task for you. But if you are looking for a quicker and more efficient solution without the hassle of running a new Ethernet cable, you need to know the following two ideal alternatives.
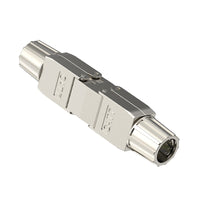
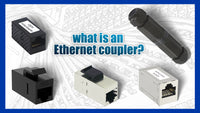
Use an Ethernet Coupler
The Ethernet coupler is quite an easy way to repair your Ethernet cable. This small, rectangular coupler can help connect two patch cables, and it is easy to operate.

Here, let's dive into a real-life scenario where your CAT6 cable requires repair.
Before installation, prepare the following materials and tools:
- CAT6 connectors
- CAT6 Ethernet couplers
- Stripping tool
- RJ45 crimping tool
- Flush cutter
Firstly, remove the area that needs to be repaired, and you’ll get two separate Ethernet cable ends.
Next, use two RJ45 connectors to terminate both ends of the Ethernet cable. You can choose either a pass-through connector or a non-pass-through connector. Use the wire stripper to strip the cable jacket and choose the T568A or T568B standard to arrange eight copper wires. Insert the wires into the RJ45 connectors and correctly use an Ethernet crimper to crimp them.
If you don’t know how to install RJ45 connectors, here is a tutorial video for CAT6 connector installation.
After both Ethernet cable ends are terminated, simply use the Ethernet coupler to connect these two patch cables, and you’ll get an Ethernet cable that works well.

Couplers can be shielded or unshielded, and you can opt for one according to your cable type.
In general, if you use a shielded cable, you’d better use a shielded RJ45 connector and coupler at the same time to ensure stable and efficient data transmission.
Use an Ethernet Cable Extender
Wanna an easier solution for an Ethernet cable repair? Use our Ethernet Cable Extender. Ethernet cable extenders are hard to find on the market, but they can really help when your Ethernet cable is broken. The extender is usually composed of a body with two PCB boards, cable caps, and load bars. It works as a coupler but requires no extra RJ45 connectors, making your installation simpler.
 It also doesn’t require any professional tools except a flush cutter. The extender can not only repair but also extend and reconnect Ethernet cables. Featuring a shielded body and easy operation, this extender is suitable for both novices and professionals.
Repair Your Cable Within 2 Minutes with Our Ethernet Cable Extender Adapter
Here is the detailed tutorial for installing an Ethernet cable extender if your CAT6 cable was chewed.
You just need to prepare the following three materials:
- Ethernet cable extender
- Flush cutter
- Stripping tool
STEP 1: Find the broken part and use the cable cutter to carefully cut off it.


STEP 2: Slide the cable through the cable cap. Strip both ends of the Ethernet cable.


STEP 3: Arrange and straighten eight copper wires. Insert copper wires into the load bar (the load bar is printed with T568A and T568B wiring diagram, and once you choose one color code, you need to insist on it). Then, cut off the excess wires.


STEP 4: Slide the PCB board into the load bar. Make sure that the code on the PCB board should be consistent with that on the load bar.


STEP 5: If you’re not sure whether the cable can work well or not, you should use the RJ45 tester to test it.
Some people also give the idea that you can splice the copper wire one by one to reconnect the cable. Splicing the cable is a common way to be used in electrical work, but it is not reliable in network installation. If you want to get the maximum data rate and bandwidth, never use this method. Moreover, this way is a bit difficult for some beginners to operate.
Final Thoughts
In addition to replacing the cable, there are some more simple ways to reconnect your cable. This article gives a detailed solution to cable repair. We hope that it can give you some ideas and help you out!
For more information on this topic, you can keep up on our blogs. While VCELINK offers general and basic information for our customers and other visitors to the website, it’s not professional advice.


Be the first one to comment.
Leave a comment