Brush Wall Plates: An Easy Solution for Wall Cable Entry
Contents [show]
What if there are many cables passing through your wall? What will you do to make these cables look more neat and beautiful? Brush wall plates are designed to give your wall a professional look, and this article will walk you through everything you need to know about brush faceplates and how to install them.

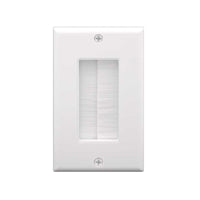
What is Brush Wall Plate?
A brush wall plate is a wall-mounted panel with a hole in the center that has many brushes or bristles. The function of the brush wall plate is to offer a path for the cables to pass through the wall, so it can sometimes also be named as a pass-through wall plate. The brush wall plate is designed to meet the requirements for cable management. Two brush wall plates are often installed, one for the cable entrance and the other for the cable exit.
The brush wall plate provides enough space for a number of different cables entering into the wall, including HDMI cables, coaxial cables, audio visual cables, speaker wires, network RJ45 cables, and other low-voltage cables.
In general, the brush is made of nylon or other synthetic materials that are soft enough to avoid cable damage. There are also pass-through brush wall plates, the brush of which is made of rubber.

Types of Brush Wall Plates
Brush wall plates can be divided into different types according to different materials and sizes. The faceplate can be metal or plastic, and the metal wall plates are also available in different finishes. The brush can also be made of nylon or rubber. Based on various sizes, they can be classified into 1 gang wall plates and 2 gang wall plates. “Gang” usually means the width of the faceplate. “1 Gang” means it has space for one device, “2 Gang” means space for two devices, and “X Gang” means space for X devices.
Advantages of Brush Wall Plates
Aesthetics: Brush wall plates provides an easy solution for wall cable entry. They are designed to provide a clean and polished look to any room by hiding cables behind the wall rather than stacks of cables hanging down the wall. Brush wall plates are ideal for home theater applications. They are often used for beautiful home or office decoration.
Easy installation: The installation of brush wall plates doesn’t require any special tools or expertise. They are easy to install even if you are a novice.
Versatility: Brush wall plates can be customized to different sizes, and they can hold different cables, including audio/video cables, network cables, and other low-voltage cables. It is also a great idea to use brush wall plates on the wall behind the wall-mounted TV.
Great Protection: The bristles of the brush can also help keep your room free of debris and dust, protecting your cables.
How to Install Brush Wall Plate?
Brush wall plates are easy to install, and once you have prepared the tools you need, you have made a half-done success. Brush wall plates are usually paired with a bracket.
Step 1: Before installing the brush wall plate, you should plan the location where you want to place it. Prepare all the necessary tools and materials at hand, including the brush wall plate, ruler, electric drill (or screwdriver), jab saw, and bracket.

Step 2: Make sure to choose the right size of the brush wall plate for the cables that you want to pass through the wall. In general, the 1-gang wall plate is enough for home use. But if you want the plate to hold more cables, a 2-gang wall plate may be a good option.
Step 3: Use a pencil and ruler to mark the location of the brush wall plate on the wall. Mark the square on the inside of the bracket.

Step 4: Because of the thickness of the bracket, remember to draw the actual size of the brush wall plate.

Step 5: Use a drywall saw or a jab saw to cut a rectangular hole on the wall according to the size of the dimensions of the mounting bracket. Ensure that you cut carefully to avoid any extra damage in the wall.

Step 6: Install the mounting bracket into the hole and screw it to the wall for stability. Ensure that the bracket is level.

Step 7: Run the cables through the mounting bracket before installing the brush wall plate.

Step 8: Let the cables pass through the brush part and secure the brush part to the mounting bracket using screws. You can use the screwdriver or electric drill to fix the screw.

Step 9: Finally, install the wall plate and tighten it with a screwdriver.

The above steps can help you easily achieve a professional-looking installation and make your cables neatly organized and protected.
Final Words
The brush wall plate is a convenient and inexpensive way to reduce cable clutters and achieve a professional look in your room or office. Brush wall plates are the perfect fit for any home theater, office, or conference room.
For more information on this topic, you can keep up on our blogs. While VCELINK offers general and basic information for our customers and other visitors to the website, it’s not professional advice.


COMMENTS