Contents
Wireless connections are quite convenient for the ease of installation, but they can be frustratingly unreliable—particularly when working from home, streaming high-definition multimedia, or supporting multiple smart home devices simultaneously. The solution? Installing Ethernet ports in-house for faster speeds, superior stability, and scarcer interruptions.
In this guide, we’ll cover everything from the fundamentals of Ethernet ports to Ethernet installation.
What is an Ethernet Port?
An Ethernet port is just a small physical socket where you can plug in Ethernet cables. Its main function is to create a reliable Ethernet connection, enabling data transmission. You can find Ethernet ports on various devices, including computers, laptops, gaming consoles, routers, and printers where they are typically integrated with the device’s NIC (Network Interface Card).
If there is no Ethernet port in your home, you can use Ethernet wall plates to create new Ethernet ports. The advantage of connecting your devices directly to your router or network switch via Ethernet ensures more reliable, predictable performance.
Equipment Needed to Add Ethernet Ports
First things first, before going hands-on, get all the materials and tools you’ll need to complete the installation. Here’s what you need to gather:
- Ethernet cable (Cat5e or Cat6): Most households may still use Cat5e speed. But Cat6 and beyond can handle higher speeds and bandwidth, which is ideal if you have a large place to cover and plan on expanding. Cat6 speed is recommended for modern home networks.
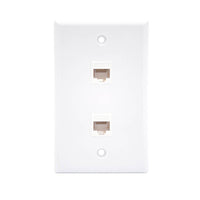
- Ethernet Wall Plate & Keystone Jacks: Here, it’s crucial to ensure their compatibility with your cable category.
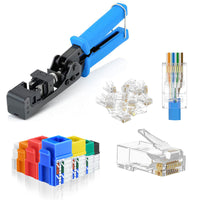
- Punch-Down Tool and Wire Stripper: For securing wires into the keystone jack.
- Drill, Drywall Saw, Fish Tape, and Stud Finder: For running cable through walls and creating clean openings.
- Cable Tester: This is Invaluable for verifying that each cable is terminated correctly, saving you future troubleshooting.
Expert Tip: Invest in quality keystone jacks and cables and avoid eventual signal loss, unstable speeds, and any frustration that may arise down the line.
How to Setup Ethernet Ports in House: Step-by-Step
1. Plan Your Layout
Decide where you need Ethernet ports. Make a simple floorplan of your house to guide the installation process. Then, determine the optimal location for the Ethernet connections; high-traffic areas are good starting points. Use a stud finder to locate support beams, and plan your cable routes through accessible spaces like basements or crawl spaces. Additionally, you need also think of the location of your router, modem, and other devices for suitable distances and enhanced connectivity.
In this planning stage, measure the cable length you’ll need, considering that standard Ethernet cables (Cat5e, Cat6) typically support a maximum distance of 328 feet (100 meters). Avoid exceeding this length to prevent speed loss and reliability.
Don’t route your cables parallel to power lines, or your network cable may experience interference, and if you need to cross electrical lines, do it at a 90-degree angle.
2. Mark the Wall and Prep Your Tools
Mark the spot on your wall at a standard outlet height for a clean look. Grab a pencil and draw a small, dark mark (an X) where you’ll place the jack. Choose a location that aligns with a clear cable path behind the wall. Gather your tools and keep them handy.
3. Cut the Opening for the Wall Plate
Trace the outline of the wall plate’s mounting bracket on your wall. To do so, simply place the bracket against the place you’ll install it, and use the tip of your pencil to outline it. This step ensures you won’t cut the hole for the wall plate in the wrong place.
With a drywall saw, cut out the opening with care. In this hole, you’ll place the mounting bracket and the keystone jack.
Ethernet wall plates make running cables through your walls much easier, cleaner, and more professionally looking. Think of Ethernet wall plates as a type of electrical outlet cover. A place where you can plug the Ethernet cable from your devices. Behind the plate, a keystone jack connects the internal wiring to your home network.
Expert tip: You can use a bubble level so the bottom and top of your outline are accurately horizontal and parallel to the floor.
Expert tip 2: To minimize the risk of electrical shock, cut the power to any electrical circuits nearby.
4. Run the Ethernet Cable and Terminate it into the Keystone Jack
Drill a small hole in the top or bottom plate of the wall cavity to insert the Ethernet cable through. If you drilled through the floor, run the cable down into the lower section, if you did it through the ceiling, run the cable from the networking center down to where the jack is located. Attach the cable end to the fish tape to guide it until it appears at the opening of the wall.
Expert tip: Avoid sharp bends to preserve signal integrity and place the cables away from power lines to minimize electrical interference.
Strip approximately an inch of the cable jacket to expose the twisted pairs. Follow the T568B wiring standard printed on the keystone jack (the most common in home settings). Match the wire colors to their respective slots. Secure the wires with a punch-down tool.
5. Secure the Mounting Bracket and Fasten the Wall Plate
After you have wired the keystone jack, you can move on and snap it into the Ethernet wall plate. Cautiously push the jack and cable back into the wall, secure the mounting bracket drilling the screws and then screw on the wall plate. Use a screwdriver or power drill to tighten it to the bracket. You now have a neat, functional Ethernet port ready to be used.
The Ethernet wall plate, also known as a network wall plate, RJ45 wall plate, or RJ45 faceplate is like a central hub where Ethernet and other data cables connect to your devices. It’s advisable to use one as it helps in keeping setups tidy and functional, protecting your cables and connectors, and allowing you easy access to faulty components without re-opening any walls.

6. Connect the Other End to Your Network
Terminate the other end of the cable similarly, with another keystone jack and a patch cable or crimping an RJ45 connector. You’ll typically find the end of the cable close to the router or network switch. Now, it’s time to plug it into your router’s LAN port.
7. Test Your Connection
Use a cable tester to verify that each wire is correctly connected. Once you confirm it, it’s time to plug in a device and run a speed test. (You can use a laptop for that purpose.) If the test results regarding speed and stability meet the expected performance, congratulations, you’ve successfully installed an Ethernet port!
Maintenance and Expansion Tips
Eventually, you might want to add more Ethernet ports later. If so, simply repeat the same steps explained above. A good practice is to label each cable at both ends to make future troubleshooting easier.
Expert tip: Keep a document of your cable routes in case you want to make upgrades or need to perform any troubleshooting in the future.
Common Mistakes You Should Avoid
- Skipping the Testing Phase: Always verify all your cable terminations before sealing walls.
- Using Low-Quality Cables: Protect yourself from having weak signals or slow speeds. Invest in quality, reputable brands.
- Ignoring Code Requirements: If you are running cables through plenum spaces, use plenum-rated cables to meet fire safety standards. Plenum cables are designed specifically to be used within a construction’s plenum space. You can learn more about their specs by clicking here.
- Poor Cable Management: Keep cables organized, labeled, and far from electrical wiring to maintain optimal performance.
Conclusion
Learning how to install Ethernet ports in-house can dramatically improve your internet experience. By using Ethernet wall plates, you’ll get a professional look and enjoy the benefits of reliable, high-speed wired connections. Regardless of your needs for stable connectivity (work, entertainment, hobbies, or the use of smart home devices), wired Ethernet ensures you’re covering your current needs and are prepared for future expansions. Your home network just made a 180-degree turn! Happy networking.
For more information on this topic, you can keep up on our blogs. While VCELINK offers general and basic information for our customers and other visitors to the website, it’s not professional advice.


Be the first one to comment.
Leave a comment