Inhalt
Are you still using a Cat5e cable for your home or office network? Is your client experiencing network issues? If the answer is yes, it might be the moment to upgrade. Cat6 cables provide faster speeds and superior bandwidth. This translates into a better, more enjoyable experience while doing activities like: Streaming in high resolution, online gaming, video conferencing, and transferring bulky files.
Upgrading network cabling might seem like a complex journey, but it’s not. You just need to go step-by-step. And in this guide, we’ll walk through the steps to substitute your Cat5e cables with Cat6 cables.
Why Should You Upgrade from Cat5e to Cat6?
Upgrading to Cat6 will result in a more reliable connection that can withstand high-resolution streaming, online gaming, and heavy file transfers. Cat6 cables bring real, noticeable improvements that keep your connection fast and reliable. So, if you have numerous devices, enjoy activities like gaming or streaming, or merely want to future-proof your network, Cat6 is a solid bet.
Let’s review some of the benefits and advantages of upgrading to Cat6:
Faster Speeds and Better Performance
- Higher Data Speeds – Cat5e supports speeds up to 1 Gbps over 100 meters, while Cat6 can reach 10 Gbps for distances of up to 55 meters. That’s a major benefit when you need quick, efficient data transfers.
- Future-Proofing – As both in homes and offices, more devices connect to networks every year, with Cat6 cabling, the network will be able to keep up with growing speed and bandwidth demands.
More Bandwidth, Fewer Bottlenecks
- Handles More Data Simultaneously – Cat6 cables operate at 250 MHz, more than double the 100 MHz of Cat5e.
Less Interference, More Stability
- Better Cable Design – Cat6 cables have tighter twists and often include a spline separator, reducing electromagnetic interference (EMI). Consequently, there will be fewer data errors and a more stable connection.
- Stronger Signal – With lower crosstalk and noise, Cat6 allows “cleaner” data transmission, which is crucial for online gaming, video calls, and real-time applications.
Stronger Power over Ethernet (PoE) Support
- Higher Power Output – While both Cat5e and Cat6 support PoE, Cat6 comes with thicker copper wires that can handle higher wattage: an ideal choice for powering advanced devices such as high-end Wi-Fi access points, IP cameras, and VoIP phones.
- Supports More Devices – As smart home and office technology continues to advance, Cat6 is built to meet the growing power and data needs of newer PoE devices.
Cost-benefits Advantages
- Smart Investment – Cat6 cables cost about 10–20% more than Cat5e, but they extend your network’s lifespan, reduce the need for frequent upgrades, and -as we’ve just seen- enable you to enjoy increased performance, speed, and steadiness.
Things to Keep in Mind Before Upgrading
- Not Just Cables – Upgrading to Cat6 might require buying new connectors, patch panels, and proper cable terminations to get the full benefits.
- Thicker, Less Flexible Cables – Cat6 cables are stiffer, given their tighter twists and built-in separators, so plan your cable runs and space needs with this fact in mind.
If you want faster speeds, better performance, and a more reliable network that’s ready for the future, making the jump to Cat6 is an intelligent move.
How to Upgrade From Cat5e to Cat6?
Evaluate Your Existing Network and Future Needs
The first thing you need to do is to decide which part of the Cat5e cables needs to be replaced with Cat6 cables. Make a list of locations that require re-termination, including wall plates, network devices, and patch panels.
Indoor vs. Outdoor Runs
If you’ll have cables running outdoors or through damp areas of the house or office, choose Cat6 cables rated for outdoor or direct burial use. These are specifically built to withstand moisture and other menacing environmental factors. For indoor replacements of Cat5e cables, you should first determine whether they are used in standard or plenum spaces. If installation is required in a plenum area, CMP-rated cables are the safest choice.
Tools and Supplies You Will Need
You are almost about to start upgrading to Cat6 cabling! But first, let’s make sure you have all the tools and materials you’ll need beforehand. Here we’ll discuss what you’ll need and why:
- Cat6 Cable (Bulk or Pre-made): If you enjoy DIY projects or need precise, custom-length Cat6 Ethernet cables, bulk cables are the ideal choice. But if you want to save time, pre-terminated Cat6 Ethernet cables will be a better choice. Choose UL-listed or ETL-verified cables to ensure top-notch functioning and safety.
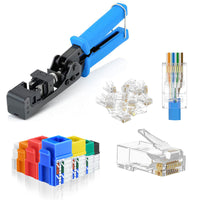
- RJ45 Connectors (Cat6-Rated): These connectors are built to fit the thicker Cat6 cables seamlessly. Look for RJ45 connectors with gold-plated contacts, as they provide better conductivity and resist corrosion.
- Network Tools: Network tools like RJ45 crimping tools, cable strippers, and cable testers are required for the precise and efficient termination of Cat6 Ethernet cables.
- Cable Management Tools: For a tidy setup, use Velcro ties, cable trays, or conduits. Organized cables look better and, what matters most, make maintenance tasks way easier.
- Fish Tape/Cable Puller: Indispensable for running cables through walls or conduits without producing damage. This also makes pulling cables through tight spaces much more manageable
Once you have the tools and supplies, you’re halfway. With this list we’ve seen, you're equipped to make a successful Cat6 cabling upgrade!
Step-by-Step Guide to Upgrading from Cat5e to Cat6
You’re ready now to go from Cat5e to Cat6 and enjoy higher speeds, improved performance, and a network set to deal with future challenges or changes. Now, simply go step-by-step so the process goes smoothly. Let’s get into it!
Disconnect and Label Old Cat5e Cable
- Power Down Your Devices: Before unplugging anything, turn off all your devices. You won’t want to accidentally damage your valuable equipment.
- Label Both Ends of the Cables: Don’t neglect this simple but helpful step. Using labels or masking tape, mark both ends of all the cables. For instance, you can write something like "Router to Switch Port 3". With this practice, you’ll save yourself from future puzzle-solving stress when reconnecting everything.
Remove the Old Cat5e Cable
- Be Gentle: Pull the cables out with utmost care, particularly if they're inside conduits or bundled with other wires. Forcing them out could harm the existing cables. Prepare Your Cat6 Cable
- Measure Cable Paths: Measure how much cable you need for each run and add about 10% extra. Avoid finding yourself out of enough cables.
- Strip the Outer Cable Jacket: Use a cable stripper to remove about 1–2 inches of the outer jacket and expose the twisted pairs and spline.
Terminate the Cat6 Cable
- Untwist and Align: Separate and straighten each twisted pair. Sort the Wires Properly: Inside, you’ll find twisted pairs. Untwist and straighten the cables, and then proceed to connect them in the correct order. The T568B standard (the most broadly used in North America) is:
1) White-Orange
2) Orange
3) White-Green
4) Blue
5) White-Blue
6) Green
7) White-Brown
8) Brown - Insert Into Connector: Softly insert the wires into a Cat6-rated RJ45 connector. Make sure they go all the way in to ensure a solid connection. Check if each conductor is fully inserted in the correct channel.
- Crimp: Use a Cat6-compatible crimping tool to secure the connector. One good squeeze should be enough.
- Repeat on the Other End: Don’t forget to keep the same wiring standard (T568B or T568A) on both ends. If they don’t, the cable won’t work as it should.
Test Each New Cable
- Use a Cable Tester: Before routing your cables, test them! A quick check can detect wiring errors long before they cause network problems.
- Check for Crosstalk: Some testers measure noise and crosstalk. This is significant for ensuring your Cat6 cable performs up to standard.
Label and Manage Your Cat6 Cables
- Tag or Label All Cables: Label both ends of your cables with the placement or device names. Use the patch panel with labels for optimal performance.
- Keep Everything Well-Organized: Use Velcro or hook-and-loop ties rather than zip ties. These won’t crush the cable and will let you easily adjust them later. Avoid over-tightening your cables to keep the internal twist rate.
Further Expert Tips You Should Consider
1. Respect Proper Bend Radius
Cat6 cables are commonly thicker and harder than Cat5e. To maintain the signal quality, avoid bending the cables more tightly than four times their diameter. For most Cat6 cables, this means keeping bends to about an inch or more.
2. Prevent Electromagnetic Interference
Be wary of the distance. Keep your network cables far from electrical lines and fluorescent lighting to lessen interference. If you have no other option than crossing power cables, do so at a 90° angle.
3. Plan Ahead
If you're considering integrating more devices (like smart gadgets, security cameras, or computers), into your network, it's wise to install extra Cat6 lines or conduits. This anticipation makes future expansions much easier.
Common Mistakes You Should Avoid
Skipping the Cable Tester
Not testing the cables can make unseen issues stay undetected. Those will only come to the surface under heavy use.
Using the Wrong RJ45 Connectors
Cat5e connectors might not fit properly with thicker Cat6 wires. Always use Cat6-rated connectors to maintain a reliable connection.

Overstuffing Conduits
Attempting to insert too many cables in a single conduit can damage cable jackets and make future upgrades a real hassle.
Ignoring Local Codes
Certain spaces, like air plenums, require plenum-rated cables for safety reasons. Using the wrong kind of cable can result in code violations and possible insurance issues.
Follow these guidelines one by one and stay away from making the most common mistakes, and you'll set up a solid and efficient Cat6 network that's built to last.
Conclusion
If you’re thinking about upgrading from Cat5e to Cat6, go for it. It’s one of the smartest ways to future-proof any network. You’ll get faster speeds, improved reliability, and less interference, giving your setup the breathing room it necessitates to handle growing demands.
Again, keep in mind that upgrading is not solely about changing cables. A good upgrade includes several stages, from planning and terminating your cables correctly to testing everything before claiming “it’s done”. Get it right, and you’ll have a network that’s ready for anything from streaming in 4K, gaming without lag, or running a busy home or office without any problems.
For more information on this topic, you can keep up on our blogs. While VCELINK offers general and basic information for our customers and other visitors to the website, it’s not professional advice.


Geben Sie als Erster einen Kommentar ab.
Hinterlasse einen Kommentar